Crack monitor zi-2s is developed in some modifications with supplements and tools. Construction of this model fits into specific requirements of a buyer. A buyer determines, how a crack monitor will look and what options are included in ordered tools.
To make an order you should choose one of eight modifications, and then point necessary additional options. The order is preparing for delivery to the buyer very fast – during 1-3 days, depending on quantity of ordered monitors and chosen options.
Modifications of crack monitors zi-2s:
| № | Modification | Description of modification | Sketch | Elements of monitor construction | ||
| Metallic reference points | Mounting plates | Clue layer (sticky pads) | ||||
| 1 | zi-2s | Basic |  |
– | – | – |
| 2 | zi-2s (P) | Pro |  |
+ | – | – |
| 3 | zi-2s (H) | High basic |  |
– | + | – |
| 4 | zi-2s (PH) | High pro |  |
+ | + | – |
| 5 | zi-2s (A) | Basic with clue layer (sticky pads) |  |
– | – | + |
| 6 | zi-2s (PA) | Pro with clue layer (sticky pads) |  |
+ | – | + |
| 7 | zi-2s (HA) | High basic with clue layer (sticky pads) |  |
+ | + | + |
| 8 | zi-2s (PHA) | High pro with clue layer (sticky pads) |  |
+ | + | + |
Additional options:
- Branding – placing of logo and information about buyer (phone number, site and so on) on the gauge scale. Branding is made with weatherproof polymer sticker.
- Clamp is applied for fastening of crack monitor plates in zero position for the period of mounting.
- Marking gauge-ruler – used as comparator for measuring of crack width and for marking of holes for dowels to fasten crack monitor.
- Mounting plates are fastened to crack monitor plates for adjusting of mounting height on uneven surfaces in the site of fastening to constructions under observation.
- Adjusting plate is used for provision of split between scale and transparent crack monitor plate. The split allows to compensate possible deformations (movements) of observed construction from the mounting monitor surface, that provides its integrity (not damageability) and possibility of long-term observations.
- Angle element is used for mounting of crack monitor on the corners of constructions. It is fastened to one of plates of crack monitor with clue.
- Reference screws are used as reference points for exact observations with electronic caliper gauge. They may be screwed into crack monitor or in adjusting plates.
- Hex key is used for screwing of reference screws.
Technical characteristics
At observation over crack monitor scale
- Range of observations along the axis Х -20+20 mm
- Range of observations along the axis У -10+10 mm
- Division value 1 mm
At exact observations over reference points
Range of observations along the axis Х -20+40 mm (in positive direction measures are possible at way out of indicative cross outside, e. g. more +40 mm)
Accuracy depends on used devices for measurement. It is recommended to apply caliper gauges digital (electronic) with accuracy of measurement to 0, 01 mm
Construction
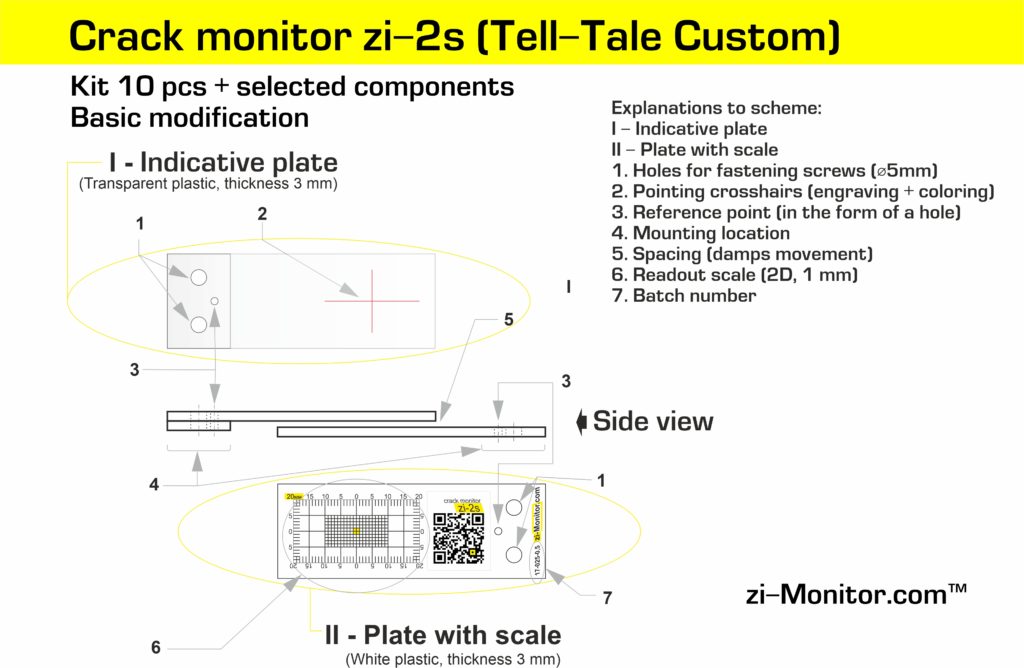
The conceptual construction and particularities of crack monitors zi-2s are shown on the schemes:
Buy
Buy crack monitor zi-2s:
- On our store – Crack monitor zi-2s (Tell-Tale Custom). Kit 10 pcs + selected components reviews
- On eBay – Crack Monitor zi-2s – Basic modification (Tell-Tale light) Lot of 10 pcs
- On Amazon – Crack Monitor zi-2s
- Also, you can use EAN / UPS code to search – 4620038820096
